
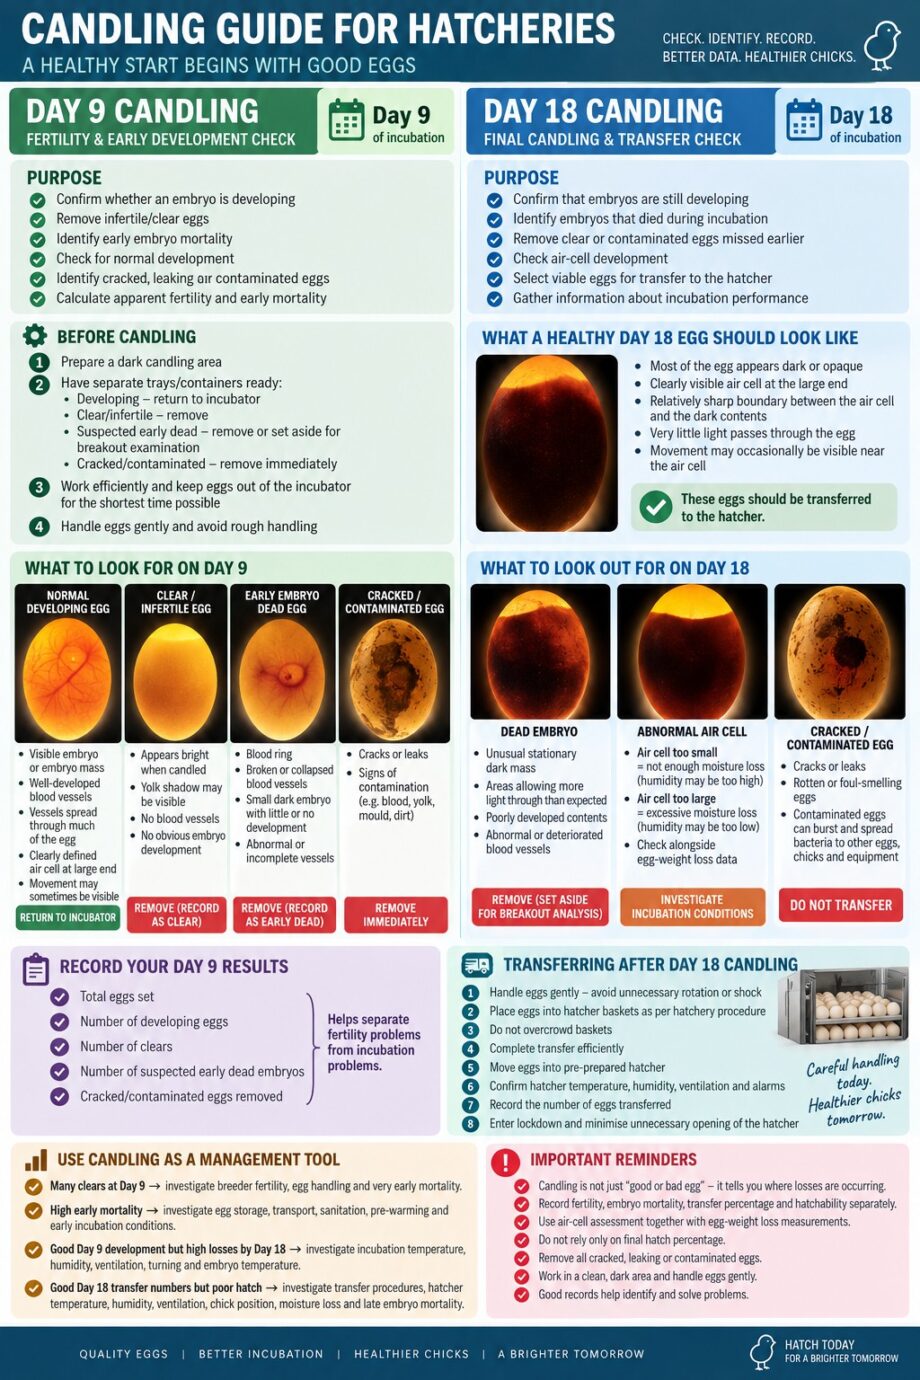
Candling fertile eggs is one of the most important quality-control checks during incubation. It allows us to identify infertile eggs, early embryo mortality, abnormal development and eggs that should not be transferred to the hatcher.
For broiler fertile eggs, we recommend two main candling checks: Day 9 and Day 18.
DAY 9 – FERTILITY & EARLY DEVELOPMENT CHECK
Purpose
The Day 9 candle is primarily used to:
- Confirm whether an embryo is developing.
- Remove infertile/clear eggs.
- Identify early embryo mortality.
- Check whether development appears normal.
- Identify cracked, leaking or contaminated eggs.
- Calculate apparent fertility and early mortality.
Before Candling
Prepare the candling area before removing eggs from the incubator.
The room should be reasonably dark so that the contents of the egg can be seen clearly.
Have separate trays or containers ready for:
1. Developing eggs – return to incubator
2. Clear/infertile eggs – remove
3. Suspected early dead embryos – remove or place aside for breakout examination
4. Cracked, leaking or contaminated eggs – remove immediately
Work efficiently. Avoid leaving the eggs outside the incubator unnecessarily and avoid rough handling or sudden impacts.
What to Look For on Day 9
NORMAL DEVELOPING EGG
A healthy fertile egg should normally show:
- A visible dark embryo or embryo mass.
- A well-developed network of blood vessels.
- Blood vessels spreading through a significant portion of the egg.
- A clearly defined air cell at the large end.
- Movement may sometimes be visible when the egg is candled.
These eggs should be returned to the incubator.
CLEAR / APPARENTLY INFERTILE EGG
A clear egg will normally appear bright when candled.
You may see:
- The yolk shadow.
- No visible blood vessel network.
- No obvious embryo development.
Remove these eggs and record them as clears. Where fertility performance is being investigated, conduct a breakout examination rather than automatically assuming every clear egg was infertile. Very early embryo death can sometimes resemble infertility during candling.
EARLY EMBRYO DEATH
Possible signs include:
- A blood ring.
- Broken or collapsed blood vessels.
- A small dark embryo with little or no active vascular development.
- Abnormal or incomplete vessel development.
Remove and record these separately from clear eggs.
Record Your Day 9 Results
For every batch, record:
- Total eggs set.
- Number of developing eggs.
- Number of clears.
- Number of suspected early dead embryos.
- Cracked/contaminated eggs removed.
Do not rely only on the eventual hatch percentage. Day 9 results help separate fertility problems from incubation problems.
DAY 18 – FINAL CANDLING & TRANSFER CHECK
Day 18 candling should normally be performed as part of the process of transferring eggs from the setter/incubator into the hatcher.
Purpose
The Day 18 candle is used to:
- Confirm that embryos are still developing.
- Identify embryos that died during incubation.
- Remove clear or contaminated eggs that were previously missed.
- Check air-cell development.
- Select viable eggs for transfer to the hatcher.
- Gather information about incubation performance.
What a Healthy Day 18 Egg Should Look Like
By Day 18, the embryo occupies most of the egg.
When candled, you should normally see:
- Most of the egg appearing dark or opaque.
- A clearly visible air cell at the large end.
- A relatively sharp boundary between the air cell and the dark contents of the egg.
- Very little light passing through the main body of the egg.
- Movement may occasionally be visible near the air-cell boundary.
These eggs should be transferred carefully into the hatcher baskets.
What to Look Out For
DEAD EMBRYOS
An egg may show:
- An unusual stationary dark mass.
- Abnormal areas allowing more light through than expected for Day 18.
- Poorly developed contents.
- Abnormal or deteriorated blood vessels.
Separate suspected dead embryos for breakout analysis where possible.
ABNORMAL AIR CELL
Pay particular attention to the size and position of the air cell.
The air cell gives valuable information about moisture loss during incubation.
Air cell too small: The egg may not have lost enough moisture. Incubation humidity may have been too high.
Air cell too large: The egg may have lost excessive moisture. Incubation humidity may have been too low.
Air-cell assessment should ideally be supported by egg-weight-loss measurements, particularly when investigating poor hatch results.
CRACKED OR CONTAMINATED EGGS
Do not transfer leaking, rotten or badly contaminated eggs into the hatcher.
A contaminated egg can burst during the final days of incubation and spread bacteria over neighbouring eggs, chicks and hatcher equipment.
TRANSFERRING AFTER DAY 18 CANDLING
Once an egg has passed the Day 18 candle:
- Handle it gently and avoid unnecessary rotation or shock.
- Place it into the hatcher basket according to the hatchery’s equipment procedure.
- Do not overcrowd the baskets.
- Complete the transfer as efficiently as possible.
- Move the eggs into the pre-prepared hatcher.
- Confirm hatcher temperature, humidity, ventilation and alarms.
- Record the number of eggs actually transferred.
- Enter lockdown and minimise unnecessary opening of the hatcher.
Remember that the embryo is approaching the internal-pipping and hatching stages. Good ventilation becomes increasingly important as embryo oxygen demand and heat production increase.
USE CANDLING AS A MANAGEMENT TOOL
Candling should not simply be a process of deciding “good egg or bad egg.”
The information collected tells us where losses are occurring.
For example:
Many clears at Day 9 → investigate breeder fertility, egg handling and very early embryo mortality.
High early mortality → investigate egg storage, transport, sanitation, pre-warming and early incubation conditions.
Good Day 9 development but high losses by Day 18 → investigate incubation temperature, humidity, ventilation, turning and embryo temperature.
Good Day 18 transfer numbers but poor hatch → investigate transfer procedures, hatcher temperature, humidity, ventilation, chick position, moisture loss and late embryo mortality.
For hatch
For hatchery management, always record fertility, embryo mortality, transfer percentage and hatchability separately. A hatch percentage on its own does not tell us where the problem occurred.