
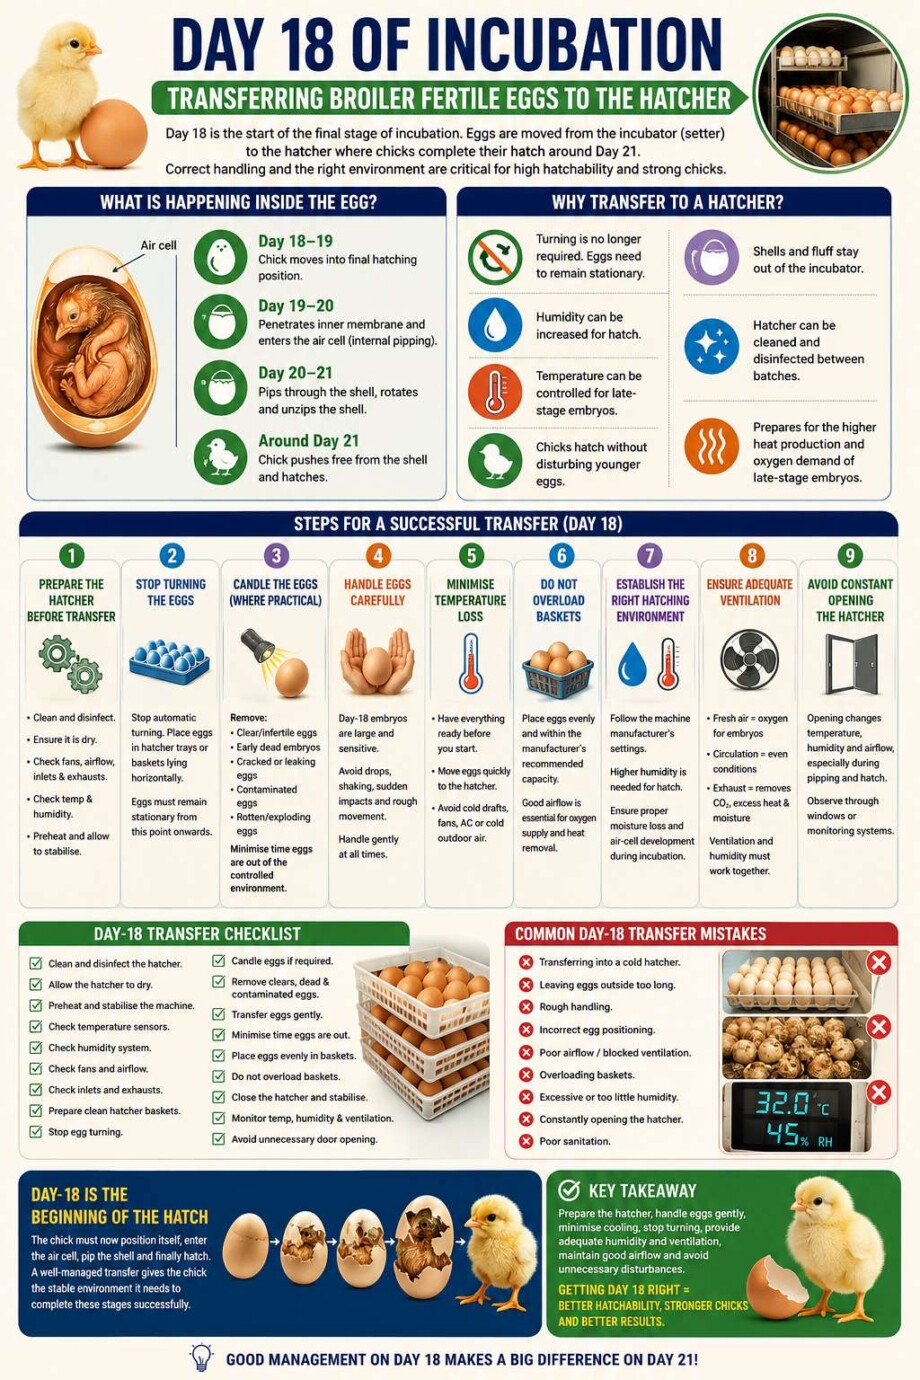
Transferring broiler fertile eggs on Day 18 is one of the most important stages when hatching broiler fertile eggs. For the first 18 days, the developing embryos remain in the incubator or setter, where the eggs are turned regularly and maintained under controlled temperature, humidity and ventilation.
At approximately Day 18, the eggs enter the final stage of incubation. They are transferred from the incubator into the hatcher, where they remain until the chicks hatch, normally around Day 21.
Correct handling during this transfer can have a significant effect on hatchability and chick quality.
What Is Happening Inside the Egg on Day 18?
By Day 18, the chick is almost fully developed and is preparing for hatch. It begins positioning its head underneath the right wing and towards the air cell at the large end of the egg.
During the next few days, the chick will normally:
Day 18–19: Move into its final hatching position.
Day 19–20: Penetrate the inner membrane and enter the air cell. This is known as internal pipping.
Day 20–21: Pip through the shell, gradually rotate inside the egg and unzip the shell.
Around Day 21: Push free from the shell and hatch.
Because the embryo is entering this sensitive stage, conditions during and immediately after transfer are extremely important.
Why Are Eggs Transferred to a Hatcher?
The incubator and hatcher perform different functions.
During the first 18 days, eggs need to be turned regularly. Turning helps prevent the developing embryo and membranes from adhering incorrectly and assists normal development.
Once the eggs reach approximately Day 18, turning is no longer required. The chick needs to settle into the correct position for hatching.
The hatcher therefore provides a separate environment where:
- Eggs remain stationary.
- Humidity can be increased for hatch.
- Temperature can be controlled specifically for late-stage embryos.
- Chicks can hatch without interfering with younger eggs in a multi-stage incubator.
- Shells, fluff and hatch debris remain outside the incubator.
- The hatcher can be thoroughly cleaned and disinfected between batches.
The transfer also allows the hatchery to prepare specifically for the much greater heat production and oxygen demand of late-stage embryos.
Step 1: Prepare the Hatcher Before Transfer
Never transfer eggs into a hatcher that has not been properly prepared.
Before transfer, the hatcher should be:
- Thoroughly cleaned and disinfected.
- Completely dry after cleaning.
- Checked for correct fan operation and airflow.
- Checked to make sure fresh-air inlets and exhausts are unobstructed.
- Checked for correct temperature and humidity readings.
- Preheated and allowed to stabilise before eggs are introduced.
Do not place Day-18 eggs into a cold hatcher and then wait for the machine to warm up.
The hatcher should already be operating under the required conditions when the eggs arrive.
Step 2: Stop Turning the Eggs
At transfer, automatic turning should stop.
Eggs are removed from the setter trays and placed into hatcher baskets or trays, normally lying horizontally.
From this point onward, the eggs should remain stationary so that the chicks can position themselves correctly for internal pipping and hatch.
Step 3: Candle the Eggs Where Practical
Transfer is also a useful opportunity to remove obviously infertile eggs and eggs containing embryos that died earlier in incubation.
When candling, viable Day-18 eggs will normally appear mostly dark because the embryo occupies most of the egg. The air cell should still be clearly visible at the large end.
Remove obvious:
- Clear or infertile eggs.
- Early dead embryos.
- Cracked or leaking eggs.
- Contaminated eggs.
- Rotten or exploding eggs.
However, avoid unnecessarily prolonged candling. Day-18 eggs should not remain outside the controlled incubation environment for extended periods.
Step 4: Handle the Eggs Carefully
Day-18 embryos are large and approaching hatch. Eggs should therefore be handled gently.
Avoid:
- Dropping trays.
- Shaking eggs.
- Roughly tipping eggs from one tray into another.
- Sudden impacts.
- Unnecessary rotation or movement.
Transfer the eggs carefully from the setter trays into the hatcher baskets.
Staff should work efficiently, but speed should never result in rough handling.
Step 5: Minimise Temperature Loss During Transfer
One of the biggest mistakes during transfer is leaving eggs outside the machines for too long.
The eggs should move from the incubator to the prepared hatcher as efficiently as possible.
Before beginning, have everything ready:
- Hatcher cleaned and preheated.
- Hatcher baskets ready.
- Candling equipment ready if being used.
- Staff briefed on their responsibilities.
- A clear route between the incubator and hatcher.
- All unnecessary delays eliminated.
Avoid placing eggs directly in cold draughts, in front of fans or air conditioners, or outside in cold conditions.
A temporary reduction in shell temperature can occur during transfer, but prolonged cooling should be avoided.
Step 6: Do Not Overload the Hatcher Baskets
Eggs need adequate airflow during the final days of incubation.
Place eggs evenly in the baskets and stay within the manufacturer’s recommended capacity.
Overloading can restrict airflow and create uneven conditions. This becomes particularly important because embryos produce considerable metabolic heat during the final days before hatch.
Good airflow helps remove this heat while supplying the embryos with oxygen and removing carbon dioxide.
Step 7: Establish the Correct Hatching Environment
Once the eggs are transferred, close the hatcher and allow the environment to stabilise.
The exact temperature and humidity settings depend on the hatcher design, airflow, egg type and manufacturer’s recommendations, so the machine’s specified operating conditions should take priority.
In general, the final hatching stage requires higher humidity than the setter stage.
Adequate humidity becomes especially important after the chicks begin pipping. If conditions become excessively dry, membranes can lose moisture and become tougher, potentially making it more difficult for chicks to complete the hatch.
At the same time, excessive humidity throughout incubation can result in inadequate moisture loss and an undersized air cell.
This is why hatchery operators should evaluate air-cell development and egg weight loss, rather than relying only on a humidity number displayed by the controller.
Step 8: Make Sure Ventilation Is Adequate
Ventilation becomes increasingly important during Days 18–21.
The embryo is now large, metabolically active and consuming substantially more oxygen than during early incubation.
The hatcher must therefore provide adequate:
Fresh air → oxygen for the embryos
Air circulation → even conditions around the eggs
Exhaust → removal of carbon dioxide, excess heat and moisture
Do not close ventilation openings simply because the machine is struggling to maintain humidity.
Humidity and ventilation need to work together.
Step 9: Avoid Constantly Opening the Hatcher
Once the eggs have been transferred and conditions have stabilised, unnecessary opening of the hatcher should be avoided.
Opening the door can rapidly change:
- Temperature
- Humidity
- Airflow
- Pressure
- Conditions surrounding pipping eggs
This becomes particularly important once external pipping begins.
Repeatedly opening the hatcher to check whether chicks are hatching can cause unnecessary environmental fluctuations.
Where possible, observe the hatch through viewing windows or monitoring systems.
Common Day-18 Transfer Mistakes
Several mistakes during transfer can negatively affect hatch results:
Transferring into a cold hatcher
Always preheat and stabilise the hatcher first.
Leaving eggs outside too long
Prepare everything before starting the transfer.
Rough handling
Move trays and eggs gently.
Incorrect egg positioning
Eggs should normally be transferred into hatcher baskets in the position recommended for the equipment, commonly lying horizontally.
Poor airflow
Do not block ventilation openings or overload baskets.
Excessive humidity
More humidity is not automatically better. Proper moisture loss and air-cell development must already have occurred during incubation.
Humidity that is too low during hatch
Once pipping starts, excessively dry conditions can contribute to drying of the membranes.
Constantly opening the hatcher
Allow the hatcher environment to remain stable, particularly during pipping and active hatch.
Poor sanitation
Hatching produces large quantities of fluff, shell material and organic contamination. The hatcher must be properly cleaned between batches.
A Simple Day-18 Transfer Checklist
- [ ] Clean and disinfect the hatcher.
- [ ] Allow the hatcher to dry.
- [ ] Preheat and stabilise the machine.
- [ ] Confirm temperature sensors are operating correctly.
- [ ] Confirm humidity system operation.
- [ ] Check circulation fans.
- [ ] Check fresh-air inlets and exhausts.
- [ ] Prepare clean hatcher baskets.
- [ ] Stop egg turning.
- [ ] Candle eggs if required.
- [ ] Remove obvious clears, dead embryos and contaminated eggs.
- [ ] Transfer eggs gently.
- [ ] Minimise the time eggs remain outside the machines.
- [ ] Place eggs evenly into the hatcher baskets.
- [ ] Do not overload baskets.
- [ ] Close the hatcher and allow conditions to stabilise.
- [ ] Monitor temperature, humidity and ventilation.
- [ ] Avoid unnecessary door opening during pipping and hatch.
Day 18 Is the Beginning of the Hatch
Day 18 should not simply be viewed as the day eggs are moved from one machine to another. It marks the transition from embryo development to the active hatching process.
The chick must now position itself correctly, enter the air cell, begin breathing through its lungs, externally pip the shell and finally complete the hatch.
A well-managed transfer gives the chick the stable environment it needs to complete these stages successfully.
For hatchery operators, the priorities are simple: prepare the hatcher before transfer, handle eggs gently, minimise cooling, stop turning, provide adequate humidity and ventilation, maintain good airflow and avoid unnecessary disturbances once the hatch begins.
Getting Day 18 right can make an important contribution to better hatchability, stronger chicks and more consistent hatchery performance.