
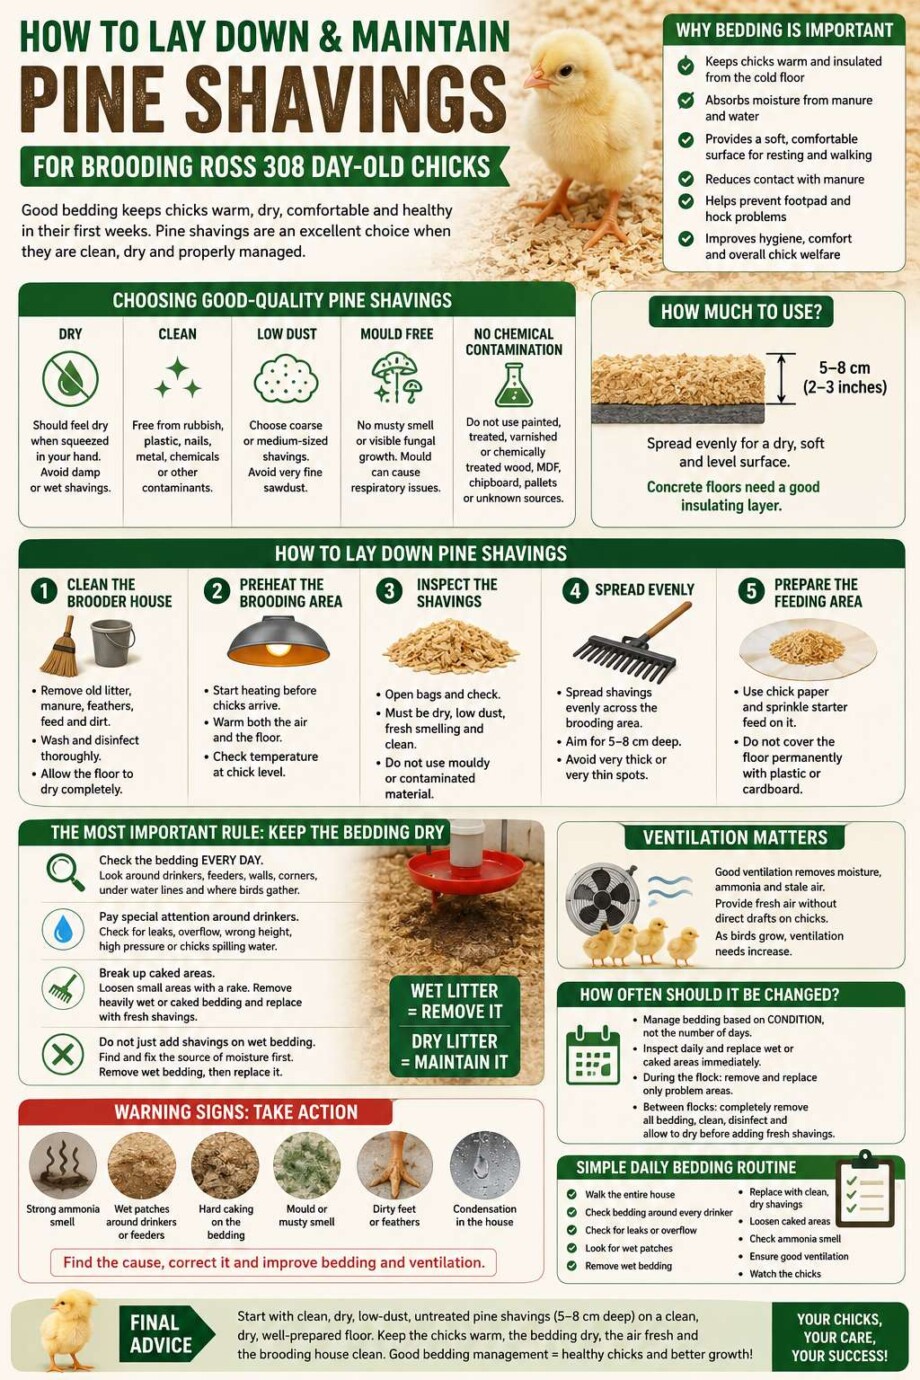
When you receive your first batch of Ross 308 day-old chicks, one of the most important parts of preparing the brooding house is the bedding. Good bedding helps keep chicks warm, dry, comfortable and healthy during their first weeks of life.
Pine shavings are an excellent bedding material for broiler chicks when they are clean, dry and properly managed. However, simply throwing a few bags of shavings onto the floor is not enough. The quality, depth and condition of the bedding can have a major influence on chick health and growth.
This guide explains how a new poultry farmer can select, prepare and maintain pine shavings correctly.
Why Do Ross 308 Chicks Need Bedding?
Day-old chicks should not normally be placed directly onto concrete, tiles or other hard floors.
A layer of pine shavings creates insulation between the chicks and the floor while also absorbing moisture from droppings and spilled drinking water.
Good bedding helps:
- Keep chicks warm.
- Insulate them from a cold concrete floor.
- Absorb moisture from manure and water.
- Provide a comfortable surface for walking and resting.
- Reduce contact between chicks and manure.
- Reduce the risk of footpad and hock problems.
- Maintain better brooder-house hygiene.
- Improve overall chick comfort and welfare.
Remember that warm air does not necessarily mean a warm floor. Before chicks arrive, both the poultry house and the bedding should be properly preheated.
Choosing Good-Quality Pine Shavings
Not all wood shavings are suitable for chickens.
Buying the cheapest bag available can sometimes cost more in the long run if the material is dusty, wet, mouldy or contaminated.
Look for pine shavings that are:
Dry
The shavings should feel dry when you put your hand into the bag. Avoid bags that feel damp, particularly if they have been stored outside.
Clean
The material should be free from rubbish, plastic, nails, pieces of metal, chemicals and other contaminants.
Low in dust
This is particularly important for day-old chicks. Extremely fine sawdust can create airborne dust, which may irritate the chicks’ eyes and respiratory system.
Choose coarse or medium-sized wood shavings rather than fine sawdust.
Free from mould
Do not use shavings that smell mouldy or musty or show visible fungal growth.
Mouldy bedding can expose young chicks to fungal spores and may contribute to respiratory problems.
Free from chemical contamination
Do not use shavings from:
- Painted wood.
- Treated timber.
- Varnished timber.
- Furniture manufacturing waste of unknown origin.
- Chemically treated pallets.
- MDF, chipboard or similar manufactured boards.
Ideally, purchase poultry bedding from a supplier who can tell you exactly what material has been used.
How Much Pine Shaving Bedding Should You Use?
For a new broiler house, aim for approximately:
5–8 cm of loose, dry pine shavings
The exact depth will depend on the floor, climate and management system.
Concrete floors generally benefit from a good insulating layer because concrete can remain cold even when the air temperature inside the brooder appears warm.
Avoid making the bedding excessively deep and uneven. The objective is to create a dry, soft and level surface.
How to Lay Down Pine Shavings
Step 1: Clean the Brooding House
Before introducing new bedding, completely clean the poultry house.
Remove old litter, manure, feathers, feed and other organic material.
Wash and disinfect the house and equipment according to your normal biosecurity programme.
Most importantly:
Allow the floor to dry properly before adding new pine shavings.
Putting dry shavings onto a wet concrete floor can result in the bottom layer becoming damp.
Step 2: Preheat the Brooding Area
Preheating is especially important for day-old chicks.
Start heating the brooding house well before the chicks arrive so that the floor and litter have time to warm up, rather than heating only the air.
A cold floor can rapidly remove heat from a chick’s body.
Check the temperature at chick level, not only at human chest or head height.
Step 3: Open and Inspect the Bags
Don’t assume that every bag is suitable simply because it is labelled pine shavings.
Open the bags and check the material.
Take a handful and inspect it.
Ask yourself:
- Is it dry?
- Is there excessive dust?
- Does it smell fresh?
- Is there a musty or mouldy smell?
- Are there foreign objects?
- Are there unusually large or sharp pieces of wood?
If the material smells mouldy or chemically contaminated, don’t use it.
Step 4: Spread the Shavings Evenly
Empty the shavings across the brooding area and spread them using a clean rake or your hands.
Aim for approximately 5–8 cm across the entire brooding area.
Avoid areas that are extremely thick or extremely thin.
Pay particular attention to the edges and corners of the brooder because bedding can move as chicks become active.
Step 5: Prepare the Feeding Area
During the first few days, many farmers place chick paper or suitable feed paper over part of the bedding and sprinkle starter feed onto it.
This helps newly arrived chicks quickly locate feed.
Do not permanently cover the entire floor with plastic, cardboard or another material that prevents moisture from escaping.
The Most Important Rule: Keep the Bedding Dry
One of the biggest mistakes new poultry farmers make is thinking:
“I put new bedding down, so I don’t need to worry about it for several weeks.”
Bedding requires daily management.
Ross 308 broilers grow extremely quickly. As they become larger, they consume more water and produce increasing amounts of manure.
Moisture therefore becomes increasingly important as the flock grows.
Check the Bedding Every Day
Walk through the poultry house at least once daily and inspect the litter.
Pay particular attention to areas:
- Around drinkers.
- Around feeders.
- Against walls.
- In corners.
- Under leaking water lines.
- Where birds congregate.
- Near entrances where rainwater could enter.
Use your hand or boot to disturb the surface occasionally.
Good litter should generally be dry and loose rather than wet, sticky or heavily caked.
Pay Special Attention Around Drinkers
The area around drinkers is often the first place where litter becomes wet.
Check drinkers regularly for:
- Leaks.
- Overflowing water.
- Incorrect height.
- Excessive water pressure.
- Chicks playing in or spilling water.
- Damaged pipes or fittings.
Simply adding fresh pine shavings on top of soaking-wet litter does not solve the problem.
Find and correct the source of the water first.
Then remove the badly saturated bedding and replace it with fresh, dry shavings.
Break Up Caked Bedding
As manure and moisture accumulate, the surface of the litter can form a hard crust known as caking.
Small areas can often be loosened using a rake.
However, heavily wet or badly caked bedding should be removed rather than simply mixed back into the litter.
Replace the removed material with clean, dry pine shavings.
Don’t Keep Adding Shavings Over Wet Bedding
This is another common beginner mistake.
If you continually place clean shavings over wet bedding, you may create a dry-looking surface while leaving a wet, decomposing layer underneath.
Instead:
- Identify why the area became wet.
- Correct the water or ventilation problem.
- Remove heavily wet material.
- Replace it with fresh pine shavings.
- Monitor the area closely.
Ventilation Helps Keep Bedding Dry
Ventilation isn’t only about keeping chickens cool.
Fresh-air exchange also helps remove moisture produced by the birds, manure and drinking systems.
A brooding house that is warm but poorly ventilated can become humid and stuffy, causing litter quality to deteriorate.
The challenge during brooding is therefore to provide sufficient ventilation to remove excess moisture and stale air without creating cold drafts directly across the chicks.
As your Ross 308 broilers become larger, ventilation requirements increase considerably.
How Often Should Pine Shavings Be Changed?
There isn’t a rule saying pine shavings must be completely replaced every 3, 5 or 7 days.
Bedding should be managed according to its condition.
During a broiler production cycle, good litter can normally remain in place while wet and heavily caked areas are removed and replaced as required.
You should therefore inspect daily and replace problem areas immediately.
For a beginner, a simple rule is:
Wet litter = remove it. Dry litter = maintain it.
Do not wait for the entire house to become wet before taking action.
Should You Replace All the Bedding Between Flocks?
For new poultry farmers, completely removing the litter between batches is a simple and effective management approach.
After the broilers leave:
- Remove the old pine shavings and manure.
- Sweep out remaining organic material.
- Clean the poultry house.
- Wash where appropriate.
- Disinfect the house and equipment.
- Allow everything to dry thoroughly.
- Observe an appropriate downtime/biosecurity period.
- Add fresh, clean pine shavings.
- Preheat the house before the next day-old chicks arrive.
Reusing litter is practised commercially, but it requires considerably more management of moisture, ammonia, disease pressure and litter condition. A first-time farmer is generally better off starting each flock with clean bedding where practical.
Warning Signs That Your Bedding Management Needs Attention
Take action if you notice:
Strong ammonia smell
This can indicate excessive moisture, manure accumulation or inadequate ventilation.
Wet patches
Check drinkers and water lines immediately.
Hard caking
Break up minor areas or remove badly affected bedding.
Mould
Remove contaminated bedding and determine where the moisture is coming from.
Chicks with dirty feet or feathers
Inspect litter moisture and cleanliness.
Condensation inside the poultry house
Ventilation may be inadequate for the amount of moisture being produced.
A Simple Daily Bedding Routine for Beginners
Every morning and evening when checking your Ross 308 chicks:
- Walk through the entire brooding area.
- Check the bedding around every drinker.
- Check for leaking or overflowing water.
- Look for wet patches.
- Remove heavily wet bedding.
- Replace removed bedding with clean, dry pine shavings.
- Loosen lightly caked areas.
- Check for unusual or strong ammonia smells.
- Make sure ventilation is removing excess moisture.
- Check that the chicks themselves are comfortable and evenly distributed.
Don’t Forget to Watch the Chicks
Your chicks are one of your best indicators of brooding conditions.
If chicks are tightly grouped beneath the heat source, they may be cold.
If they move far away from the heat source and appear uncomfortable, conditions may be too warm.
If they are evenly distributed, eating, drinking, resting and moving normally, your brooding environment is more likely to be comfortable.
Temperature, ventilation and litter management therefore need to work together.
Final Advice for First-Time Ross 308 Farmers
Pine shavings may seem like one of the simplest parts of raising broilers, but good litter management can make a significant difference to your flock.
Start with clean, dry, low-dust, untreated pine shavings and spread approximately 5–8 cm evenly across a clean, dry and properly prepared floor.
Once the chicks arrive, don’t forget about the bedding.
Check it every day.
Remove wet areas immediately, correct leaking drinkers, loosen minor caking, maintain adequate ventilation and add fresh bedding where necessary.
You don’t need to replace the entire floor of pine shavings every few days simply because a certain number of days have passed. Manage the litter according to its condition.
For new poultry farmers, the easiest principle to remember is:
Keep the chicks warm, keep the bedding dry, keep the air fresh and keep the brooding house clean.
Getting these basics right gives your Ross 308 day-old chicks a much better environment in which to start eating, drinking and growing during those critical first weeks.